A tachometer reads engine speed from one of two signal sources, displays it on the dial, and logs running hours on a built-in hourmeter. Getting an accurate reading is all about matching the gauge's speed ratio to your engine — which is the calibration step a professional carries out on fitting.
01How Wema tachometers work
Our tachometers take their signal either from the W terminal on the alternator, or from an inductive sensor. Every Wema tachometer has a built-in hourmeter, and the multi-function models add further readouts. The gauge can process both sine and square signals.
If you're taking the feed from the alternator, connect the black wire from the tachometer to the W terminal. If you're using an inductive sensor instead, that's a job for a qualified professional.
02Installation steps
- Cut an 85 mm (3⅜") diameter panel hole. You'll need a minimum clearance of 55 mm (2³⁄₁₆") behind the panel to fit the gauge.
- Take off the fastening ring, place the gauge into the panel hole, adjust its position, then fasten the rear cover.
- Following the wiring diagram, connect the gauge to a 12 V DC or 24 V DC supply.
- Select either the red or yellow wire to set the backlight colour.
- Insert the wiring loom connector into the gauge, then adjust the speed ratio to get an accurate reading.
- Calibrate the tachometer following the speed-ratio guidance below.
03Installation notes
- Wema tachometers must be calibrated to the engine before use — they are not for DIY installation. These instructions are for a qualified marine electrician with access to the correct equipment.
- Customer installation is possible if the engine specifications are known.
- If the specifications are unknown, it's often possible to connect the tachometer to the W terminal on the alternator and cycle through the settings until the known idle RPM is displayed. Open the throttle to confirm the full range of movement then shows on the gauge.
04Calibrating the speed ratio (professional)
The speed ratio tells the gauge how to translate the incoming signal into RPM. Set it from the engine type using the table and formula below.
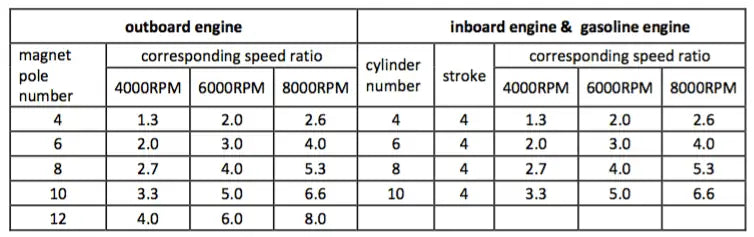
Where Q is the number of magnet poles (outboard engine) or the number of cylinders (inboard engine), Max is the maximum speed the gauge can read, and R is the speed ratio to set:
Speed-ratio formula
R = (Q / 2) × (Max / 6000)
For example, a 3-cylinder, 4-stroke engine on a tachometer with a full scale of 4000 RPM: R = (3 / 2) × (4000 / 6000) = 1.0 — so set the speed ratio to 1.0.
For a two-stroke engine, speed ratio = 3 × (RPM / 6000). For example, on a 4000 RPM tacho: 3 × (4000 / 6000) = 2. Enter the settings mode and set the corresponding speed ratio.
Speed-ratio calculator
Set speed ratio to
1.0
exact 1.000
Shown to the nearest 0.5 — the gauge's adjustment step (range 0.5–250). Fine-tune against a known idle if the reading is slightly off.
Adjusting the speed ratio
a. Hold down the rubber button on the back of the gauge for 3 seconds to enter settings mode. Holding it for more than 3 seconds again exits settings mode.
b. A press of the button increases the value. To decrease it, release the button and press again — the value then counts down. The longer you hold, the faster it changes. The minimum step is 0.5 and the adjustable range is 0.5–250.
c. Release the button at the required value; the tachometer saves the selection after 3 seconds. Repeat a–c to re-adjust.
If the deviation is large, set the speed ratio a little higher than the calculated value; if it's small, a little lower. The needle points to the corresponding position as you adjust. If the formula isn't clear, you can instead set it by idle speed: with the engine started and idling, enter settings mode and adjust the speed ratio until the needle sits at the idle reading.
Browse the range
Tachometers & sensors
Tachometers with built-in hourmeters, multi-function gauges, and the inductive sensor for engines without a usable W terminal.
05Common questions
Can I install a tachometer myself?
Only if you know the engine specifications. Otherwise it's a job for a qualified marine electrician, because the gauge must be calibrated to the engine before use.
What signal does the tachometer need?
Either a feed from the W terminal on the alternator, or an inductive sensor. The gauge handles both sine and square signals.
Does it record engine hours?
Yes — every Wema tachometer has a built-in hourmeter, and the multi-function models add further readouts. It ships set at zero and counts from there; it can't be set to match an existing hour reading, so replacing an old hourmeter starts the total again from zero.
Is the 3k tachometer available?
The analogue 3k is special order only, with a minimum order quantity of 25. The 4k and 8k are stock items, and any other tachometer in the range will work for a 3k setup.
Not sure which tachometer or signal source suits your engine? Get in touch with your engine details and we'll point you to the right gauge.